Creating and Editing New Sections with the Component Manager
The Components section of Admin allows you to add components to your Web site.
- What is a Component?
- How Do I Get to the Component Manager?
- Add a Component
- Move a Component to/from Public Access
- Rename a Component
- Password Protect a Component
- Delete a Component
What is a Component?
A Component is a way to present information of a certain type to your visitors. File Cabinet and Photo Album components are built into your Family Website. Additional types of components may be created via the Component Manager, to present the following types of information to your visitors:
- Blog - a series of messages such as a daily journal or vacation log. Your site may include multiple blogs.
[Learn more about the Blog component] - Family Tree - information about your family members including ancestors, descendents and individual details.
[Learn more about the Family Tree component] - Calendar - your family's schedule including views by month and event details. Your site may include multiple calendars.
[Learn more about the Calendar component] - Guest Book - a place for visitors to submit their information for your review; entries that you approve become part of the viewable Guest Book.
[Learn more about the Guest Book component] - Links - your favorite links.
[Learn more about the Links component] - Recipe Book - thousands of recipes viewable by a click of your mouse; included are a powerful search tool to make finding the right recipe easy, plus tools to add and organize your own recipes.
[Learn more about the Recipes component] - RSS News Feeds - on-line news delivered automatically to your Family Website by CNN and other major news providers, in categories such as Entertainment, Business, Travel, and many more; you decide which news feeds to subscribe to. Your site may include multiple RSS components, each with its own subscription(s).
[Learn more about the RSS component] .
Components may exist in your site's public area, which all visitors can access via the Menu tab. Components may also be in your site's Members area, which can be accessed only via Member Login. Whether they're in the public or private sections of the site, individual components may be assigned read and write passwords limiting who can view and manage their content. When you are logged in as Administrator, you can view and manage all components.
[Back] [Top]
Getting to the Component Manager
- Log in to your Famster's Admin
- Click the Admin tab
- Hover over Security Center

- Click Manage Components


Add a Component to Your Web Site
To display information on your Web site, you put it into a component. Different types of components can hold different types of information. So your first step is to decide what kind of component you wish to add. Next, choose a unique name for it. Its name will appear in the site's navigation, so choose a name that will make sense to your visitors. Then decide if you want any visitor to be able to see the information, or if you want it seen only by visitors who log in as a "Member".
When you're ready to add your component, here are the steps:
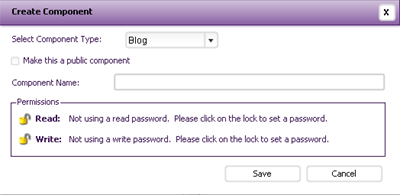
- Click Create Component

- Type in the name you would like to use for the component

- Choose the type of component you would like to create
- If you would like the component to be viewable to non-Users, check Make This a Public Component
- When finished, click Save
Move a Component
You may move a component between the public section of your site and the members-only section at any time. Here are the steps:
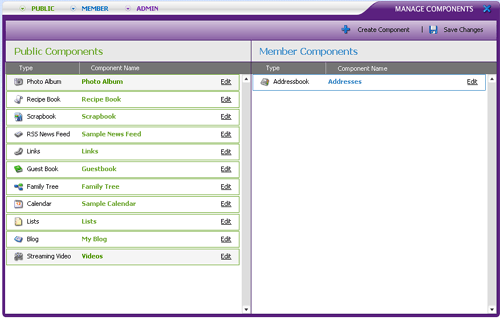
- Your existing components are listed in the boxes labeled "Public" and "Members". The components in the "Public" box appear in your site's "Menu" navigation. The components in the "Members" box appear in your site's "Members" navigation. The order in which the components are listed is the same order in which their names appear in the site navigation
- To make a component public instead of members only, or vice versa, click on the component and drag it from its current box to the box that you want it to be in.
- To make the component's name appear before or after other components in the same navigation, click on the component and drag it up or down in its current box.
- Click the "Save" button to finish
Rename a Component
The component's name appears in the site's navigation, so name your components with that in mind. You may rename a component at any time. Here are the steps:
- Click the Edit link which appears to the right of the component's name in the component list

- The Edit Component form will appear. In the "Name" field, type the new name for the component
- Click the "Okay" button so to confirm the change
- Click the "Save" button to finish
Password Protect a Component
You can use the Component Manager to assign passwords to your Web site's folders, controlling who can view them and allowing non-Administrators to edit them without gaining access to all administrative options. They can only edit the folder that they are logged in to.
To password protect a component:
- Click Edit on the right of the desired component button

- Click the Lock icon next to the desired password type

- Type your desired password in the new field

- When finished, click Save
Delete a Component from your Site
Here are the steps to Delete a Component, removing it from the site's navigation:
- Click the Edit link for the desired component
- In the Edit Component form, click the "Delete" button
- Click the "Yes" button to confirm. (To exit without deleting the component, click the "No" button)
- Refresh the browser window and confirm that the component no longer appears in the site's navigation
